A spout pouch lives or dies on details a product photo never shows: the bore of the fitment, where it is welded to the film, and whether the laminate can survive the temperature of your fill. Get those right and you have a package that pours cleanly, reseals, and ships without weeping. Get them wrong and you find out in a warehouse full of leakers. This walkthrough moves through the specification the way a filler actually builds one, working from the volume inward.
Start With Fill Volume and Headspace
Begin with the number of milliliters you actually need to hold, then add room. Spouted pouches are commonly built anywhere from 50 ml single-serves up to 5 L refills, and the trade tends to group them into three practical bands: roughly 50-200 ml for baby food, energy gels and single-serve sauces; 250-500 ml for drinkable yogurts, beverages and condiments; and 750-2,000 ml and beyond for household liquids, detergents and bulk drinks. If your product sells in fluid ounces, the conversions worth memorizing are 100 ml at about 3.4 fl oz, 250 ml at 8.5 fl oz, 500 ml at 17 fl oz and 1,000 ml at 34 fl oz. Do not fill to the brim. A spouted pouch needs headspace so the seal area stays clean during filling and so the pack can flex without stressing the spout weld. Filling to somewhere around 85-90 percent of the pouch’s water capacity is a common working target, but your co-packer will confirm the exact figure for your line and product.
Choose the Spout Diameter by Viscosity
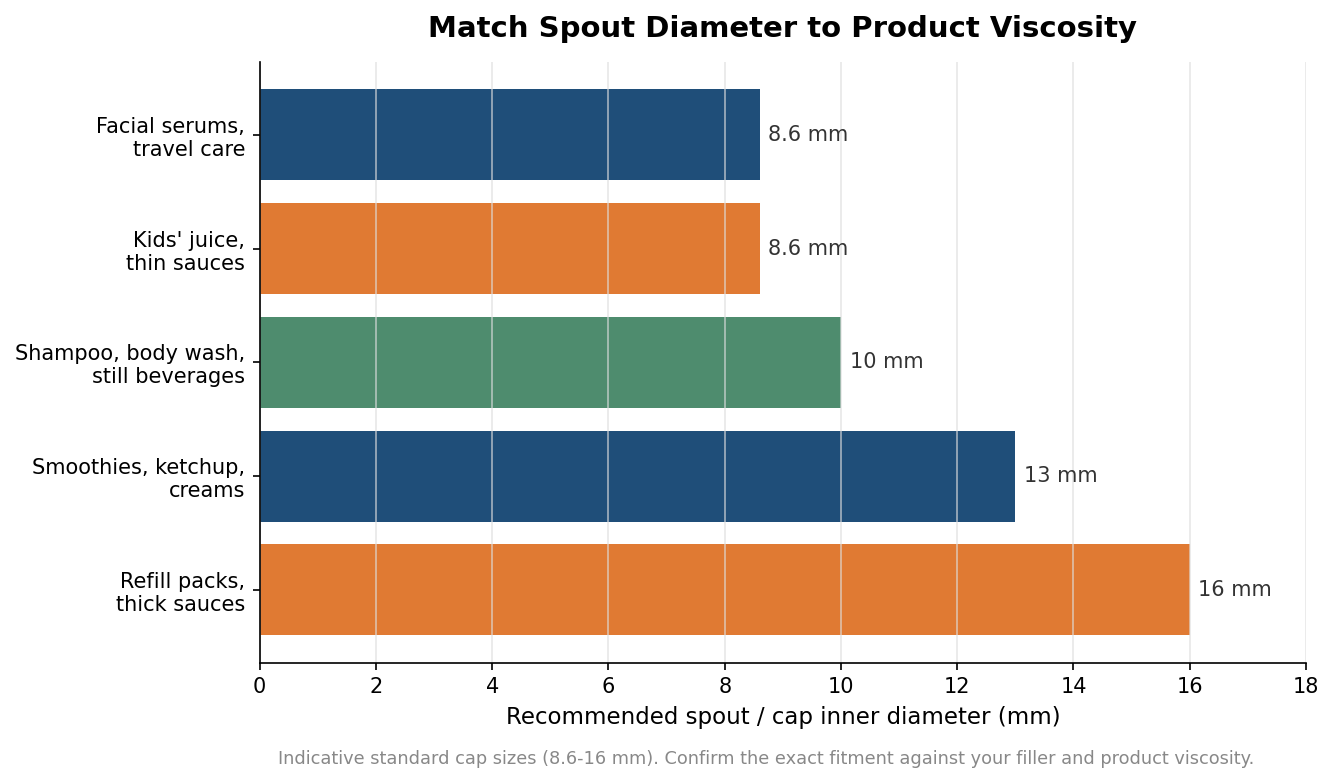
The single spec that most shapes the pouring experience is the spout bore. Thin, watery products want a small opening for control; thick or chunky products want a wide one so the user is not fighting the pack. As a rough map, an 8.6 mm fitment suits travel-size personal care, kids’ juice pouches and thin sauces like soy or vinaigrette; 10 mm is the workhorse for standard shampoos, body washes and still beverages; 13 mm handles higher-viscosity drinks such as smoothies, medium sauces like ketchup, and hair masks or creams; and 16 mm is aimed at refill packs in the one-to-five-liter range and thick sauces like mayonnaise. Micro-dispensing fitments in the 5-8.6 mm range exist for high-value serums where you want a slow, deliberate flow. Treat these as indicative standards rather than rules, because the right choice also depends on whether you are hot-filling and how the consumer holds and squeezes the pack.
Decide Where the Spout Sits
Placement changes both ergonomics and how the pouch stands. A top-corner spout, set at an angle on one shoulder of the pouch, gives better one-handed flow control and tends to suit thicker products and pour-and-measure use. A center-top spout, mounted in the middle of the top seal, pours in a balanced stream, reseals easily, and stores upright with less tendency to lean. There is a filling consequence too: corner-spout formats are often filled through the spout after the pouch is sealed, while other formats are filled through an open top that is then sealed shut. Neither is universally better, so decide based on how the product is dispensed and, critically, on whether your co-packer’s line is tooled for top-spout or corner-spout pouches, because that decision drives the fitment tooling and the filling equipment together.
Match the Laminate to What Is Inside
The film structure is where shelf life is won or lost. Oxygen-sensitive and light-sensitive products need a higher-barrier laminate than a household cleaner does. Common constructions run from a lighter PET/PE for undemanding contents, to PET with a metallized or foil layer and a polyethylene seal (often written PET/AL/PE) where you need a strong oxygen and light barrier, up to reinforced high-barrier laminates with sturdier gussets for large refill packs. Oils generally need protection from light; juices need an oxygen barrier to hold flavor and color; dairy-based products typically demand the highest barrier of the group. If sustainability is on your roadmap, recyclable mono-material and compostable structures do exist, but they trade away some barrier and heat resistance, so validate them against your real shelf-life target rather than assuming they match foil laminates.
Plan the Fill Method, MOQ, and Print Route
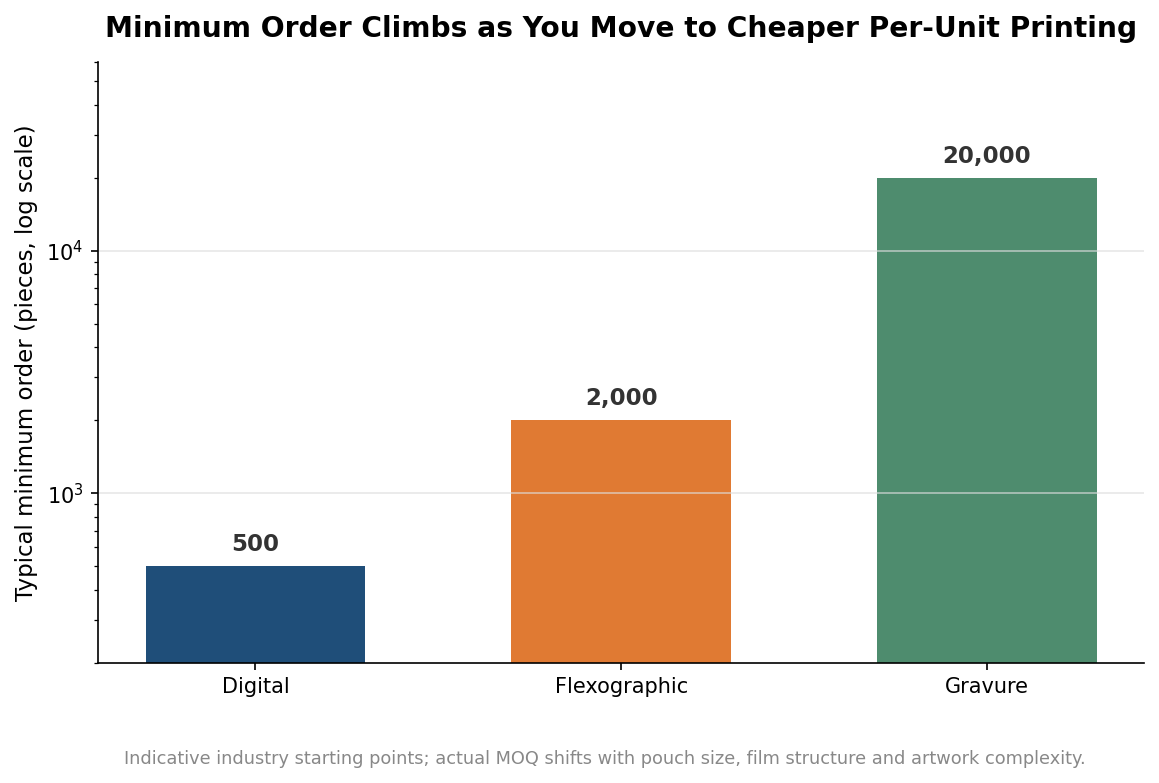
Two questions decide much of your cost: how hot you fill, and how many you buy. Hot-fill and retort processes put real stress on the spout weld, which is the highest-stress joint on the whole pack. Not every laminate or fitment is rated for high temperatures, so state your maximum fill temperature at the outset and ask the supplier to confirm that both the film and the spout are rated for it. Reputable converters run seal-strength and leak testing as standard, and the spout weld deserves particular scrutiny for hot fills and long transport legs. On quantity, minimums track the print method: digital printing commonly starts near 500 pieces and suits smaller, colorful runs; flexographic printing typically wants around 2,000; and gravure, which delivers the highest fidelity on very long runs, often starts near 20,000. Sampling before a production run is normal, and indicative timelines of roughly a week for samples and a couple of weeks for production are a reasonable planning assumption, though both vary by converter and season.
Specify in that order, volume, then spout bore, then placement, then laminate, then fill and print, and most of the expensive surprises disappear before you ever cut a die. Bring your product’s viscosity, its fill temperature and its target shelf life to the first conversation, and a capable converter can translate those three numbers into a pouch that performs on the shelf and in the hand.