Category: Uncategorized

  • How to Size a Stand-Up Pouch to Your Product’s Fill Weight

    How to Size a Stand-Up Pouch to Your Product’s Fill Weight

    The most common pouch-sizing mistake is ordering by weight. A brand knows it sells its product in twelve-ounce units, finds a pouch labeled for twelve ounces, and orders it, only to discover the bags overflow with whole-bean coffee or swim half-empty with a dense powder. A pouch does not hold a weight; it holds a volume. What decides whether your product fits is how much space that weight takes up, and that comes down to bulk density.

    This is a short, practical method for going from a fill weight to a pouch size that actually seals and looks full on the shelf, with the coffee math worked out and the adjustments for other products spelled out.

    Size by volume, not by weight

    Bulk density is the weight of a product per unit of loose volume, and it varies enormously across the things that go into stand-up pouches. Roasted whole coffee beans sit around 0.37 grams per milliliter, ground coffee a little denser at about 0.40, while rice runs near 0.75 and granulated sugar around 0.80. Loose-leaf tea is far lighter, and fine powders fall somewhere in the middle. The practical consequence is that the same twelve ounces occupies wildly different amounts of space depending on what it is.
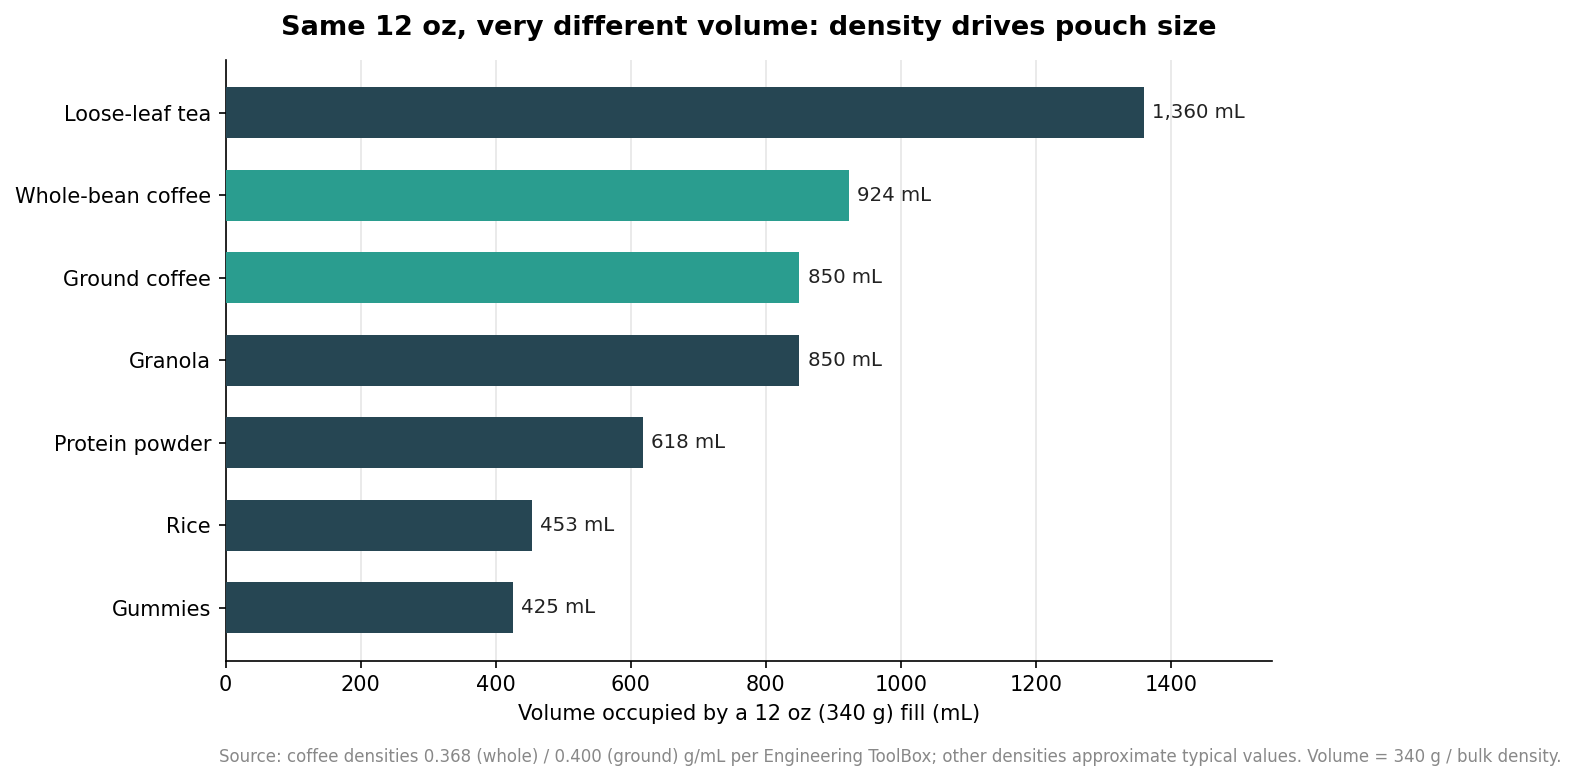
    Horizontal bar chart of the volume that a fixed 12 oz fill occupies for tea, coffee, granola, protein powder, rice, and gummies
    A fixed 12 oz weight occupies very different volumes by product, which is what really sets pouch size.

    Read the chart as a warning against the twelve-ounce label. Twelve ounces of whole-bean coffee needs well over twice the volume of twelve ounces of gummies, and loose-leaf tea of the same weight needs more space still. A pouch that comfortably holds a dense granola will look starved with the same weight of tea, and one sized for tea will burst its seals if you try to force in the same weight of rice. Start every sizing decision from the volume your specific product occupies, which you get by dividing the fill weight by its bulk density.

    Leave room to seal: the headspace rule

    A pouch cannot be filled to the brim. The top needs clear film so the machine, or your hand, can form a clean seal without product in the seal area, and granular goods settle and shift in transit, so they need somewhere to move. The common guidance is to plan for roughly fifteen to twenty percent headspace above the product, meaning the pouch’s working volume should exceed your product’s loose volume by about a fifth.

    That single allowance is what separates a calculated volume from a pouch size you can actually order. Take the loose volume your fill weight occupies, add about twenty percent, and you have the minimum internal volume the pouch needs to provide. Skip this step and even a correctly calculated pouch will overfill, contaminate its own seal, and fail quality checks at exactly the wrong moment.

    From fill weight to a pouch size, using coffee

    Whole-bean coffee is the clearest worked example because its density is well documented and its retail weights are standardized. Divide the fill weight by 0.37 grams per milliliter to get the loose volume, then add twenty percent for headspace, and you have the internal volume to shop for.
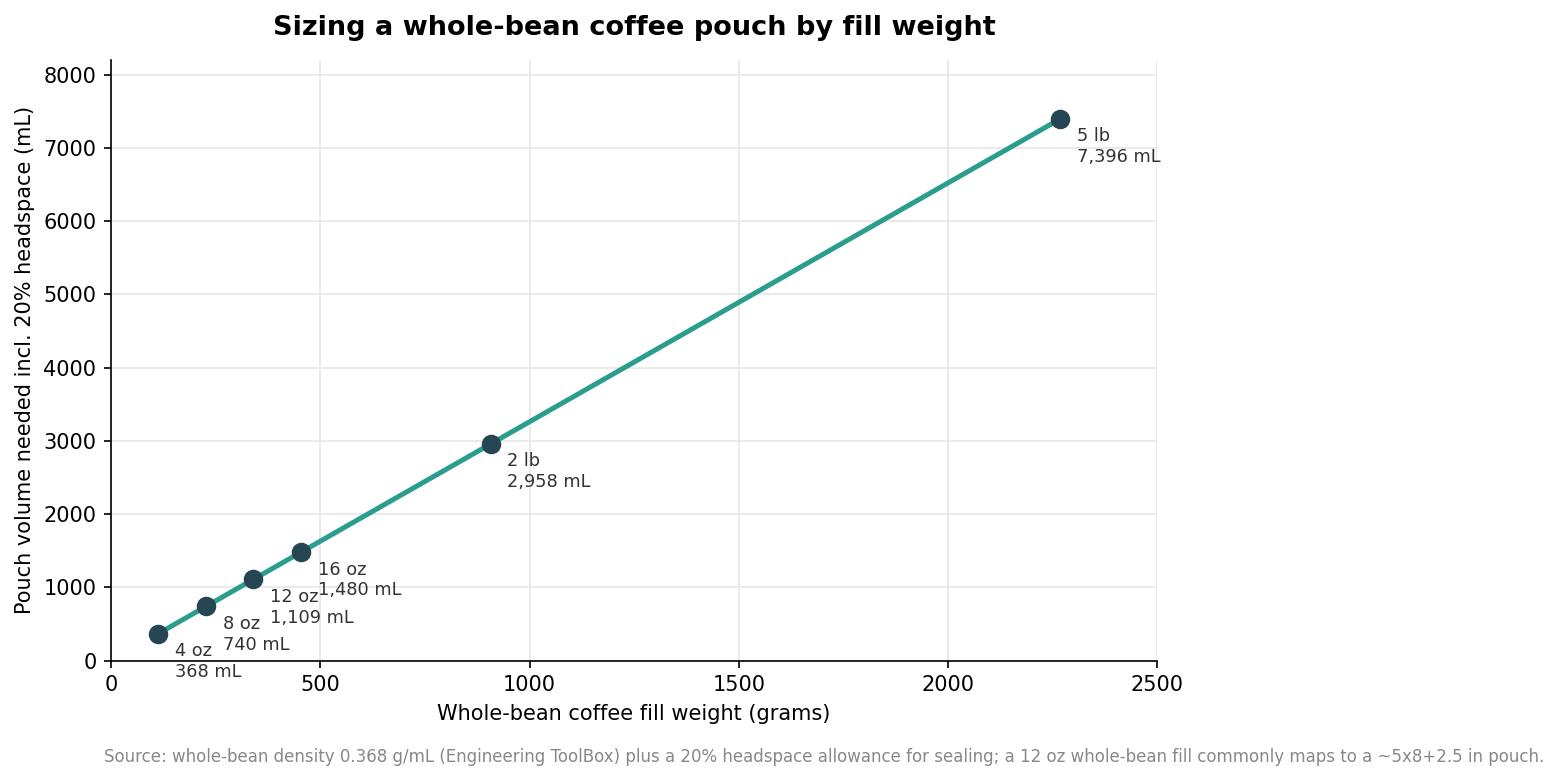
    Line chart mapping whole-bean coffee fill weight to required pouch volume including 20% headspace, from 4 oz to 5 lb
    Whole-bean coffee: fill weight to required pouch volume, with a 20% headspace allowance built in.

    The numbers land where the industry’s stock sizes already sit. A twelve-ounce whole-bean fill works out to roughly 1,100 milliliters of pouch volume once headspace is included, which is why twelve-ounce whole-bean coffee so commonly ships in a pouch in the neighborhood of a five-by-eight-inch bag with a two-and-a-half-inch bottom gusset. Scale up and the relationship stays proportional: a two-pound bag needs around three liters of pouch, and a five-pound bag climbs toward seven and a half. Because the density is fixed, doubling the fill roughly doubles the pouch volume, which makes it easy to interpolate to weights the chart does not show.

    When your product isn’t coffee

    The method is the same for anything; only the density changes. Weigh a known volume of your actual product, a filled and leveled measuring cup works, and calculate its bulk density before you trust any generic capacity label. Published figures for tea, protein powders, granolas, and snack mixes are approximate and shift with grind, moisture, and how much the product settles, so treat outside numbers as a starting point and confirm with your own material. A supplier’s pouch labeled for a given weight was almost certainly rated against a reference density that may not match yours.

    Two product traits deserve extra caution. Powders pack down over time, so a bag that looks right off the filler can slump and appear underfilled on the shelf a week later; a little extra headspace and, sometimes, a slightly smaller pouch compensates. Products with irregular, bridging shapes such as large chips or clustered granola trap air and behave as if they are less dense than a measurement suggests, so they often need more volume than the arithmetic implies. When a product is fragile, chunky, or prone to settling, size from a real fill test rather than the calculation alone.

    Confirm the size with a real fill before you commit

    The cheapest insurance against a five-figure order of the wrong pouch is a physical test. Ask your supplier for a small quantity of blank or sample pouches in the size the math points to, fill them with your real product at your real target weight, and check three things: that the product sits at an attractive fill line, that there is clean film left to seal, and that the filled pouch stands up without slumping. A gusset that is an inch deeper adds stability and capacity at a modest material premium, and a fill test is where you learn whether that upgrade is worth it for your product. Confirm the size in your own hands, and the production order becomes a formality instead of a gamble.
  • Digital vs Rotogravure vs Flexo: Choosing How to Print Your Pouches

    Digital vs Rotogravure vs Flexo: Choosing How to Print Your Pouches

    The way your pouch is printed is a bigger cost decision than the artwork on it. Three methods dominate flexible packaging, and they do not compete on quality so much as on volume: the same design can cost wildly different amounts per pouch depending on whether you run 2,000 units or 200,000. Choosing the wrong method for your order size is one of the most expensive mistakes a growing brand makes, because the penalty is baked into every unit. Here is how digital, rotogravure, and flexographic printing actually differ, and how to tell which one your run belongs on.

    Three Methods, Three Cost Structures

    The dividing line is tooling. Rotogravure engraves your design into metal cylinders, one cylinder per color, and those cylinders are a fixed cost you pay before a single pouch prints. Flexography uses flexible photopolymer plates, again one per color, which cost less to make than engraved cylinders but still represent real up-front tooling. Digital prints straight from the file with no plates or cylinders at all, so its setup cost is effectively zero and a design change costs nothing to prepare. That single difference, fixed tooling versus none, drives everything else: the minimum order, the per-unit price, and the point at which one method overtakes another. It also shapes reorders. Once gravure cylinders or flexo plates exist, a repeat run of the same design skips the tooling step and prints faster and cheaper, so a brand that expects to reorder the identical artwork many times benefits from plated methods in a way a one-time run never will.

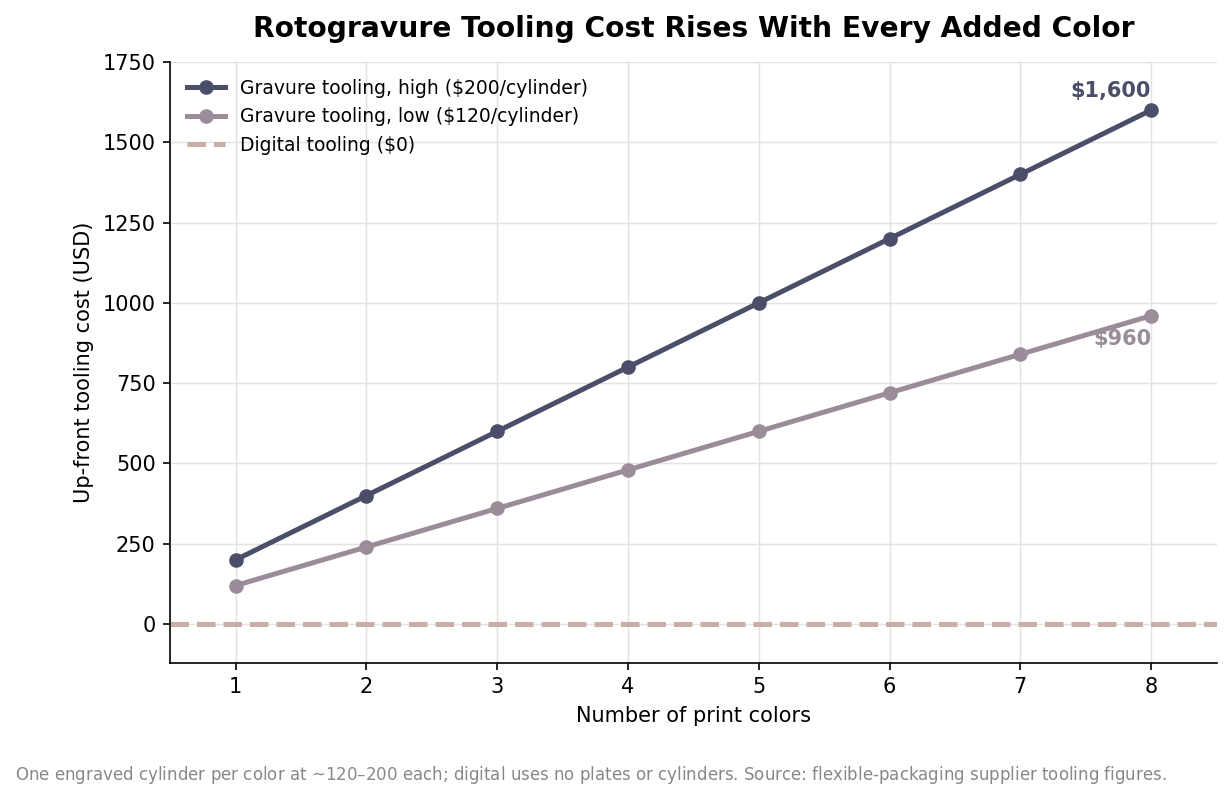
    Line chart of rotogravure tooling cost rising with number of print colors versus zero-cost digital
    Gravure tooling scales with color count at roughly $120–$200 per cylinder; digital has none.

    Rotogravure: Built for Big Volumes

    Rotogravure produces the best image quality of the three, with photo-like gradients, sharp lines, and color that stays consistent across hundreds of thousands of units, which is why premium and legacy brands favor it. The catch is the tooling. Engraved cylinders commonly run about $120 to $200 each, and because you need one per color, an eight-color design can mean roughly $1,000 to $1,600 in cylinders before production even starts. Minimum orders reflect that: for laminated pouches, gravure minimums often sit around 10,000 units as a guide, and new or revised artwork carries a lead time of about two to four weeks while the cylinders are engraved. Gravure only pays off when that fixed cost spreads across a large run, which is why it is typically reserved for high, repeating volumes.

    Flexography: The Middle Ground

    Flexographic printing occupies the space between digital and gravure. Its photopolymer plates are cheaper to produce than engraved cylinders but still add per-color tooling, so it carries a real minimum order without the eye-watering setup of gravure. Once the plates exist, the press runs fast, which makes flexo attractive for mid-volume orders where you want lower per-unit cost than digital but cannot justify gravure’s tooling. The tradeoff is quality: flexo handles solid colors and clean shapes well but struggles with the finest gradients and the most intricate detail, so a design leaning on photographic imagery may look softer than it would on gravure. For many brands it is the sensible bridge between a first digital run and a mature gravure program.

    Digital: Short Runs and Many SKUs

    Digital printing flips the cost structure. With no tooling, the minimum order can drop to a few hundred pouches or, at some digital-first shops, even to a handful for a limited edition, and turnaround for the print step is often measured in one to three days rather than weeks. That makes digital the natural home for new brands testing a product, for seasonal or limited runs, and for anyone carrying many SKUs or changing artwork often, since each variant prints with no added plate cost. Modern digital quality is strong enough that most shoppers will not notice a difference on shelf. The one place it loses is at scale: with no fixed cost to amortize, the per-unit price stays flat as volume climbs, so on a very large run digital ends up more expensive per pouch than a plated method.

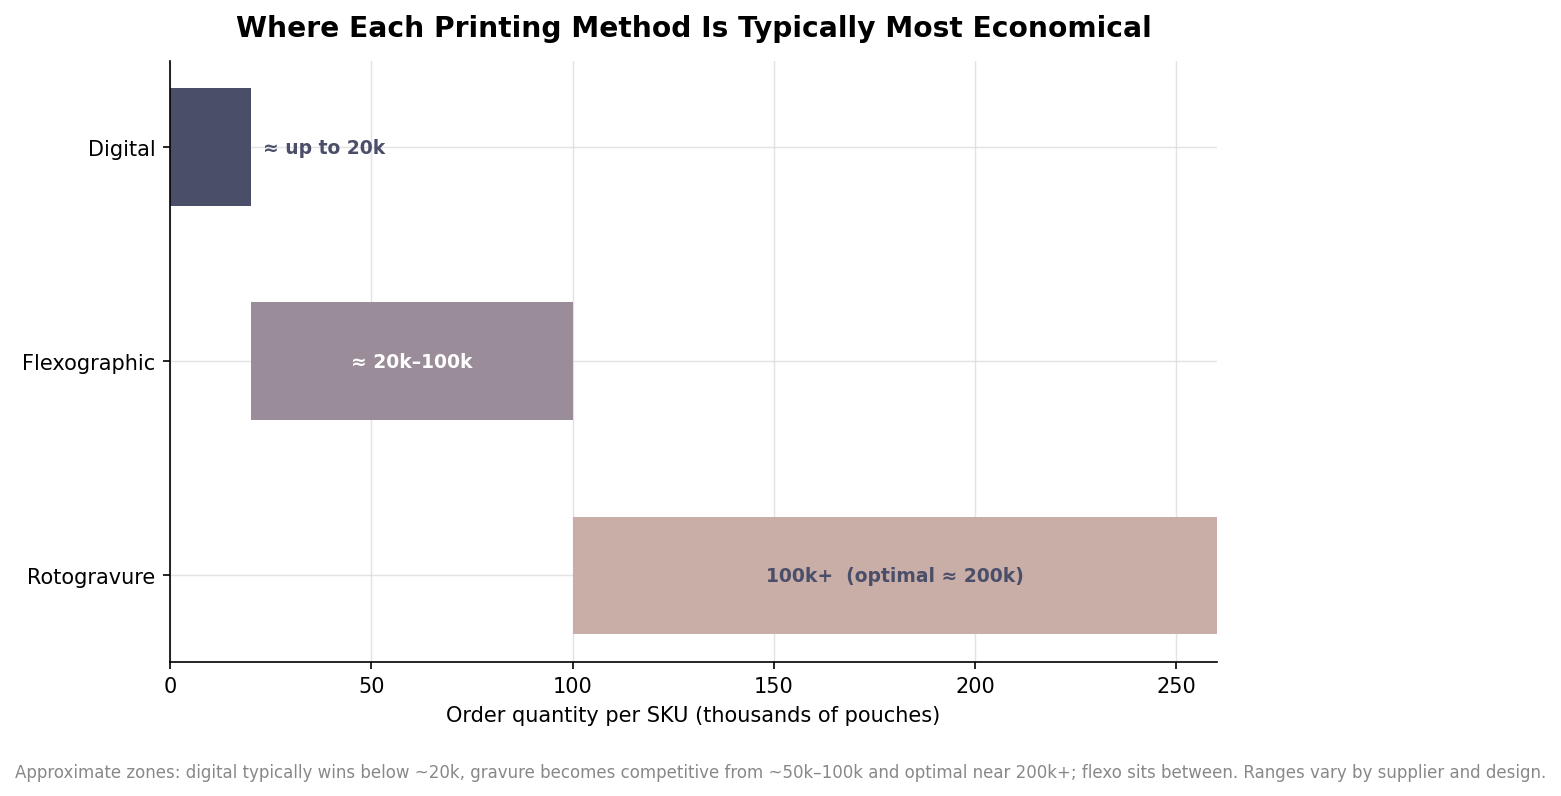
    Horizontal bar chart of the order-quantity zones where digital, flexographic, and rotogravure printing are most economical
    Approximate run-size zones where each method is most economical per pouch.

    Finding Your Crossover Point

    The decision comes down to where your order sits on the volume curve. As a rough guide, digital is typically the most cost-effective choice below about 20,000 units per SKU, gravure starts becoming competitive somewhere around 50,000 to 100,000 units, and it reaches its sweet spot at roughly 200,000 units or more of the same design per run, with flexography occupying the mid-volume ground between them. These thresholds are directional, not fixed, and they move with the number of colors, the pouch size, and each supplier’s press setup, so treat them as a starting frame rather than a rule. It helps to see how tooling amortizes. Take an eight-color gravure setup at roughly $1,300 in cylinders: spread over a 5,000-unit run that fixed cost alone adds about $0.26 to every pouch, but over 100,000 units it adds only about a cent and a third, and over 200,000 units it all but disappears. Those figures cover tooling only, not ink, film, or press time, but they show why the same cylinders that feel absurd on a small run barely register on a large one. The practical approach is to ask a supplier for a per-unit quote at your real order quantity under two methods at once, digital and whichever plated option fits, and let the crossover fall where your numbers actually land. Match the method to the run size and you stop paying for capability, or for tooling, that your volume does not need.

  • How to Specify a Spout Pouch: A Buyer’s Walkthrough

    How to Specify a Spout Pouch: A Buyer’s Walkthrough

    A spout pouch lives or dies on details a product photo never shows: the bore of the fitment, where it is welded to the film, and whether the laminate can survive the temperature of your fill. Get those right and you have a package that pours cleanly, reseals, and ships without weeping. Get them wrong and you find out in a warehouse full of leakers. This walkthrough moves through the specification the way a filler actually builds one, working from the volume inward.

    Start With Fill Volume and Headspace

    Begin with the number of milliliters you actually need to hold, then add room. Spouted pouches are commonly built anywhere from 50 ml single-serves up to 5 L refills, and the trade tends to group them into three practical bands: roughly 50-200 ml for baby food, energy gels and single-serve sauces; 250-500 ml for drinkable yogurts, beverages and condiments; and 750-2,000 ml and beyond for household liquids, detergents and bulk drinks. If your product sells in fluid ounces, the conversions worth memorizing are 100 ml at about 3.4 fl oz, 250 ml at 8.5 fl oz, 500 ml at 17 fl oz and 1,000 ml at 34 fl oz. Do not fill to the brim. A spouted pouch needs headspace so the seal area stays clean during filling and so the pack can flex without stressing the spout weld. Filling to somewhere around 85-90 percent of the pouch’s water capacity is a common working target, but your co-packer will confirm the exact figure for your line and product.

    Choose the Spout Diameter by Viscosity

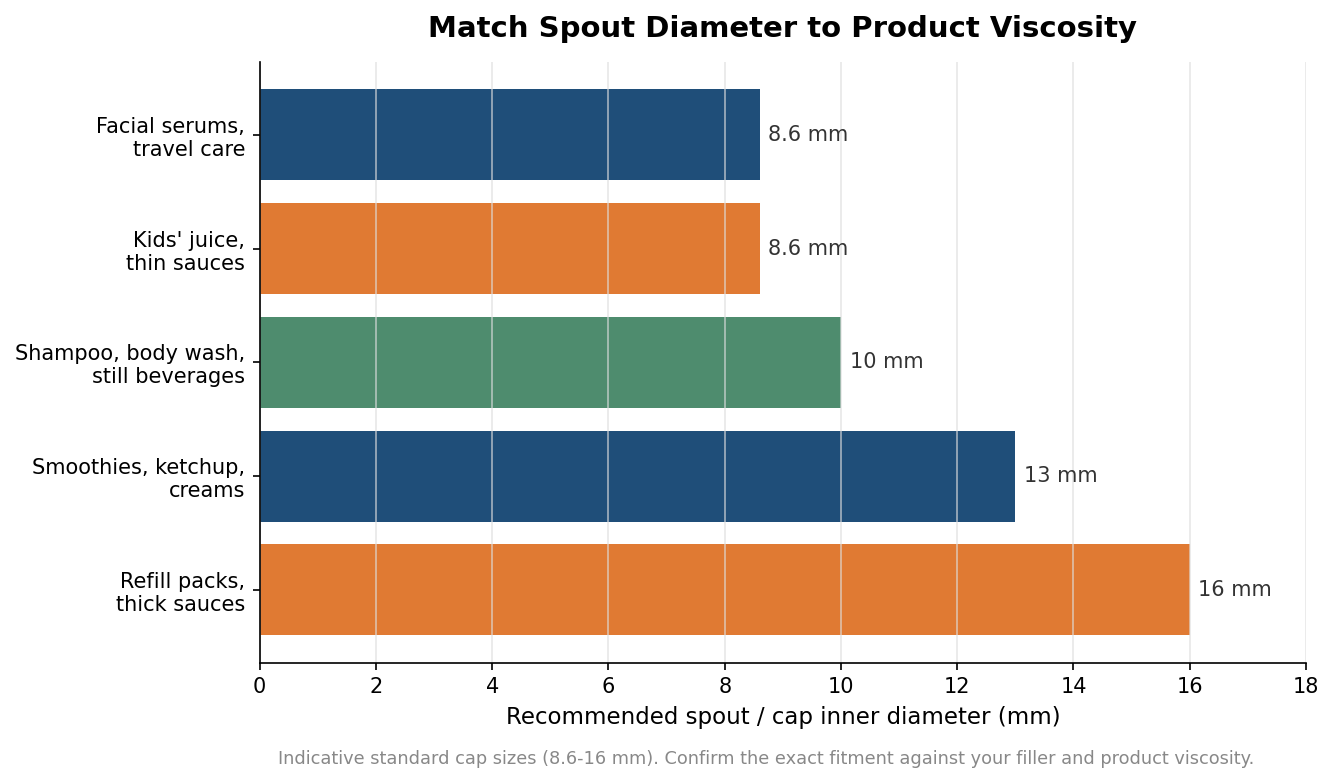
    The single spec that most shapes the pouring experience is the spout bore. Thin, watery products want a small opening for control; thick or chunky products want a wide one so the user is not fighting the pack. As a rough map, an 8.6 mm fitment suits travel-size personal care, kids’ juice pouches and thin sauces like soy or vinaigrette; 10 mm is the workhorse for standard shampoos, body washes and still beverages; 13 mm handles higher-viscosity drinks such as smoothies, medium sauces like ketchup, and hair masks or creams; and 16 mm is aimed at refill packs in the one-to-five-liter range and thick sauces like mayonnaise. Micro-dispensing fitments in the 5-8.6 mm range exist for high-value serums where you want a slow, deliberate flow. Treat these as indicative standards rather than rules, because the right choice also depends on whether you are hot-filling and how the consumer holds and squeezes the pack.

    Horizontal bar chart of recommended spout diameters from 8.6 mm to 16 mm by product type and viscosity
    Thin products take a narrow bore; thick or chunky products need a wider spout for clean flow.

    Decide Where the Spout Sits

    Placement changes both ergonomics and how the pouch stands. A top-corner spout, set at an angle on one shoulder of the pouch, gives better one-handed flow control and tends to suit thicker products and pour-and-measure use. A center-top spout, mounted in the middle of the top seal, pours in a balanced stream, reseals easily, and stores upright with less tendency to lean. There is a filling consequence too: corner-spout formats are often filled through the spout after the pouch is sealed, while other formats are filled through an open top that is then sealed shut. Neither is universally better, so decide based on how the product is dispensed and, critically, on whether your co-packer’s line is tooled for top-spout or corner-spout pouches, because that decision drives the fitment tooling and the filling equipment together.

    Match the Laminate to What Is Inside

    The film structure is where shelf life is won or lost. Oxygen-sensitive and light-sensitive products need a higher-barrier laminate than a household cleaner does. Common constructions run from a lighter PET/PE for undemanding contents, to PET with a metallized or foil layer and a polyethylene seal (often written PET/AL/PE) where you need a strong oxygen and light barrier, up to reinforced high-barrier laminates with sturdier gussets for large refill packs. Oils generally need protection from light; juices need an oxygen barrier to hold flavor and color; dairy-based products typically demand the highest barrier of the group. If sustainability is on your roadmap, recyclable mono-material and compostable structures do exist, but they trade away some barrier and heat resistance, so validate them against your real shelf-life target rather than assuming they match foil laminates.

    Plan the Fill Method, MOQ, and Print Route

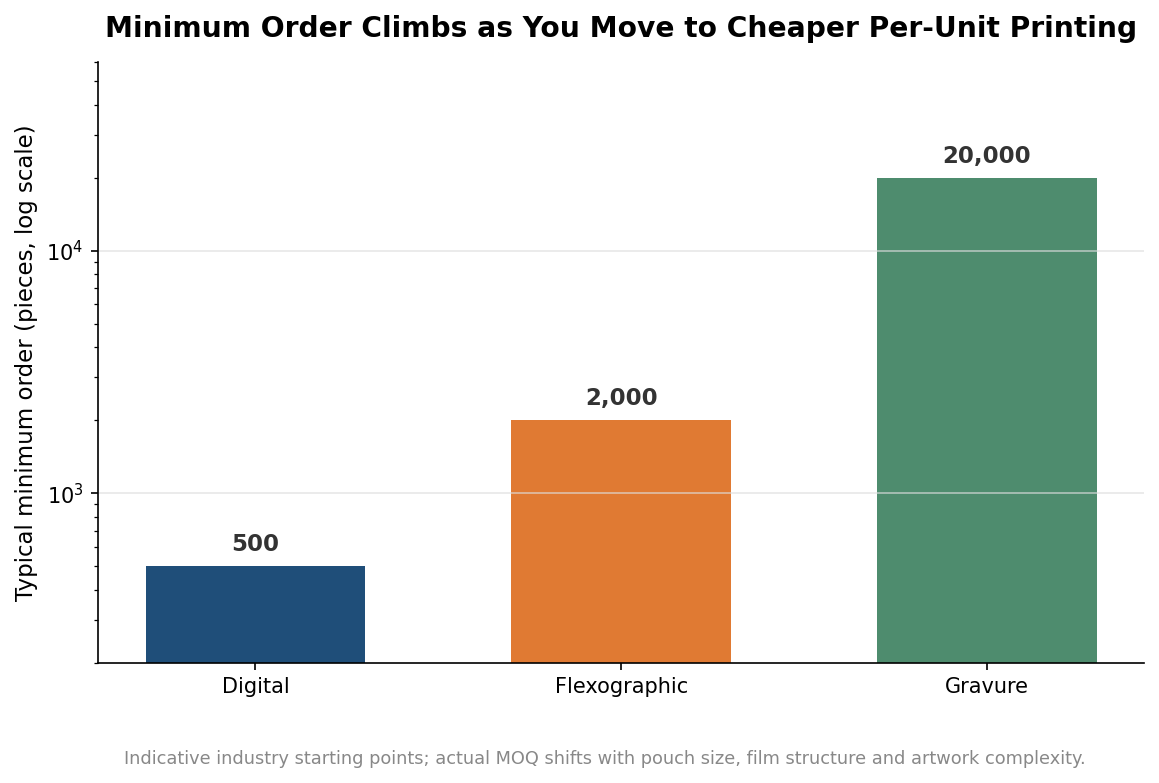
    Two questions decide much of your cost: how hot you fill, and how many you buy. Hot-fill and retort processes put real stress on the spout weld, which is the highest-stress joint on the whole pack. Not every laminate or fitment is rated for high temperatures, so state your maximum fill temperature at the outset and ask the supplier to confirm that both the film and the spout are rated for it. Reputable converters run seal-strength and leak testing as standard, and the spout weld deserves particular scrutiny for hot fills and long transport legs. On quantity, minimums track the print method: digital printing commonly starts near 500 pieces and suits smaller, colorful runs; flexographic printing typically wants around 2,000; and gravure, which delivers the highest fidelity on very long runs, often starts near 20,000. Sampling before a production run is normal, and indicative timelines of roughly a week for samples and a couple of weeks for production are a reasonable planning assumption, though both vary by converter and season.

    Bar chart on a log scale showing typical minimum order quantities of 500, 2,000 and 20,000 pieces for digital, flexographic and gravure printing
    Lower per-unit print costs come with higher minimum order quantities.

    Specify in that order, volume, then spout bore, then placement, then laminate, then fill and print, and most of the expensive surprises disappear before you ever cut a die. Bring your product’s viscosity, its fill temperature and its target shelf life to the first conversation, and a capable converter can translate those three numbers into a pouch that performs on the shelf and in the hand.

  • Stand-Up Pouch Compliance: The Standards and Certifications to Ask For

    Stand-Up Pouch Compliance: The Standards and Certifications to Ask For

    A stand-up pouch is not just a bag; it is food-contact packaging, and depending on what goes inside it can sit under food-safety law, environmental-marketing rules, and child-safety standards all at once. Most buyers focus on print quality and barrier and only discover the compliance layer when a retailer, a co-packer, or a state regulator asks a question they cannot answer. This is a plain-English map of the standards and certifications that actually apply to custom pouches, and, more usefully, what to ask your supplier to put in writing before you place an order.

    Food-contact safety is the non-negotiable baseline

    Any pouch that touches food or ingestible product has to be made from materials cleared for food contact. In the United States that means the film structure and its inks, adhesives, and coatings fall under the Food and Drug Administration’s food-contact rules in Title 21 of the Code of Federal Regulations, the same framework that governs food additives and food-contact substances. The practical concern is migration: nothing from the packaging should transfer into the product above permitted limits. If you export, the European Union’s Regulation 10/2011 on plastic food-contact materials is the parallel standard buyers ask about most.

    What to request: a written statement of food-contact compliance for the specific structure you are buying, not a generic assurance, plus confirmation that the print inks and adhesives are food-grade and that any labels or valves are covered too. A supplier who packs food every day will have this documentation ready; hesitation is a signal worth heeding.

    The PFAS question you now have to ask

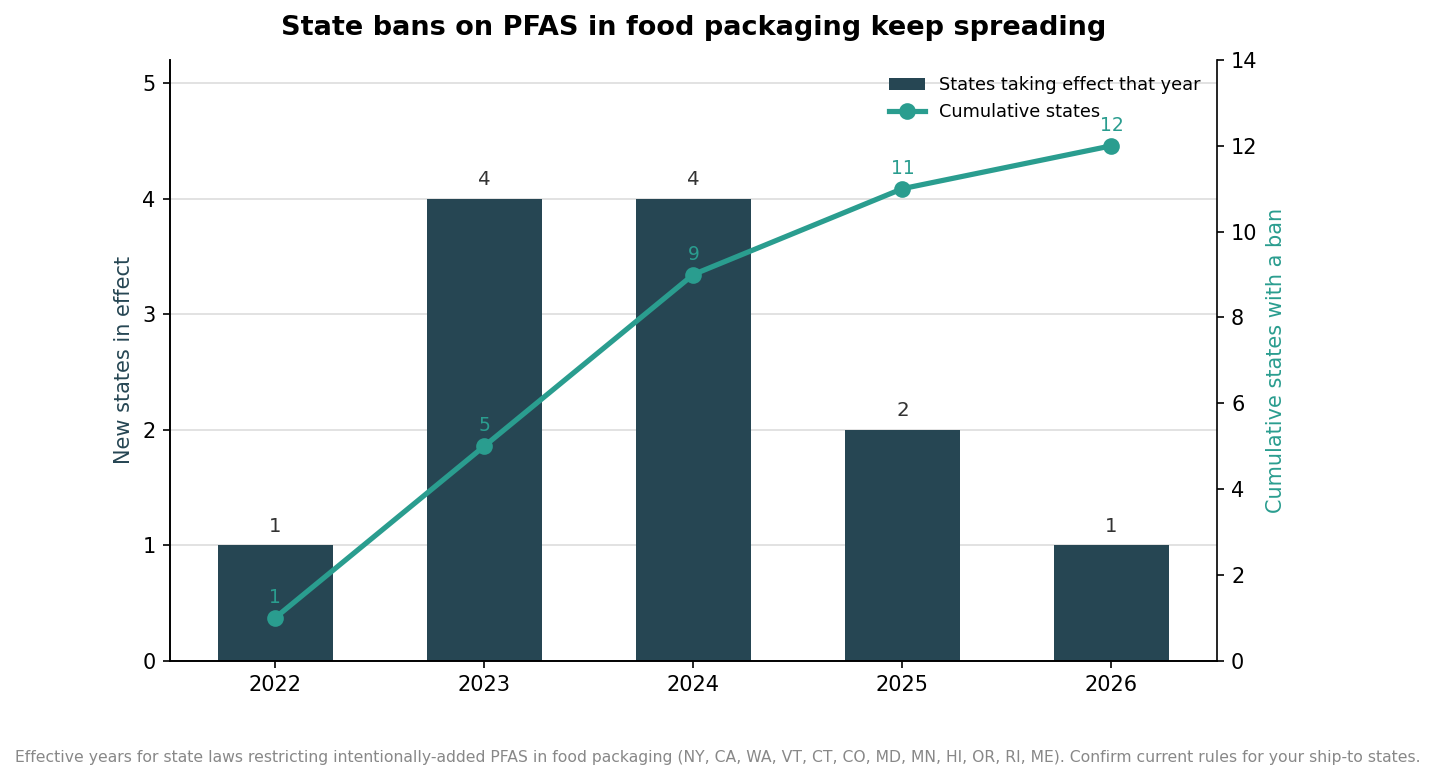
    Per- and polyfluoroalkyl substances, the grease- and water-resistant “forever chemicals,” have moved from a niche worry to a compliance requirement in a growing list of states. Laws restricting intentionally-added PFAS in food packaging are now in effect in a dozen states, phasing in from New York in 2022 through California, Washington, Vermont, and Connecticut, then Colorado, Maryland, Minnesota, and Hawaii, and on to Oregon, Rhode Island, and Maine. At the federal level, the FDA confirmed in 2024 that manufacturers had completed a voluntary phase-out of PFAS grease-proofing agents in paper and paperboard food packaging.

    Combination bar and line chart showing US states enacting PFAS food-packaging bans by effective year and the cumulative total reaching twelve
    State restrictions on intentionally-added PFAS in food packaging have reached a dozen states and keep expanding.

    Most plastic laminate pouches were never grease-proofed with PFAS the way some molded-fiber and paper packaging was, but the safe move is not to assume. Because the state laws target intentionally-added PFAS across food packaging broadly, and because your product may ship into several of these states, ask your supplier to confirm in writing that the pouch is made without intentionally-added PFAS. That single line protects you as more states join the list and as retailers push the requirement down their supply chains.

    Compostable and recyclable claims are regulated, not just marketing

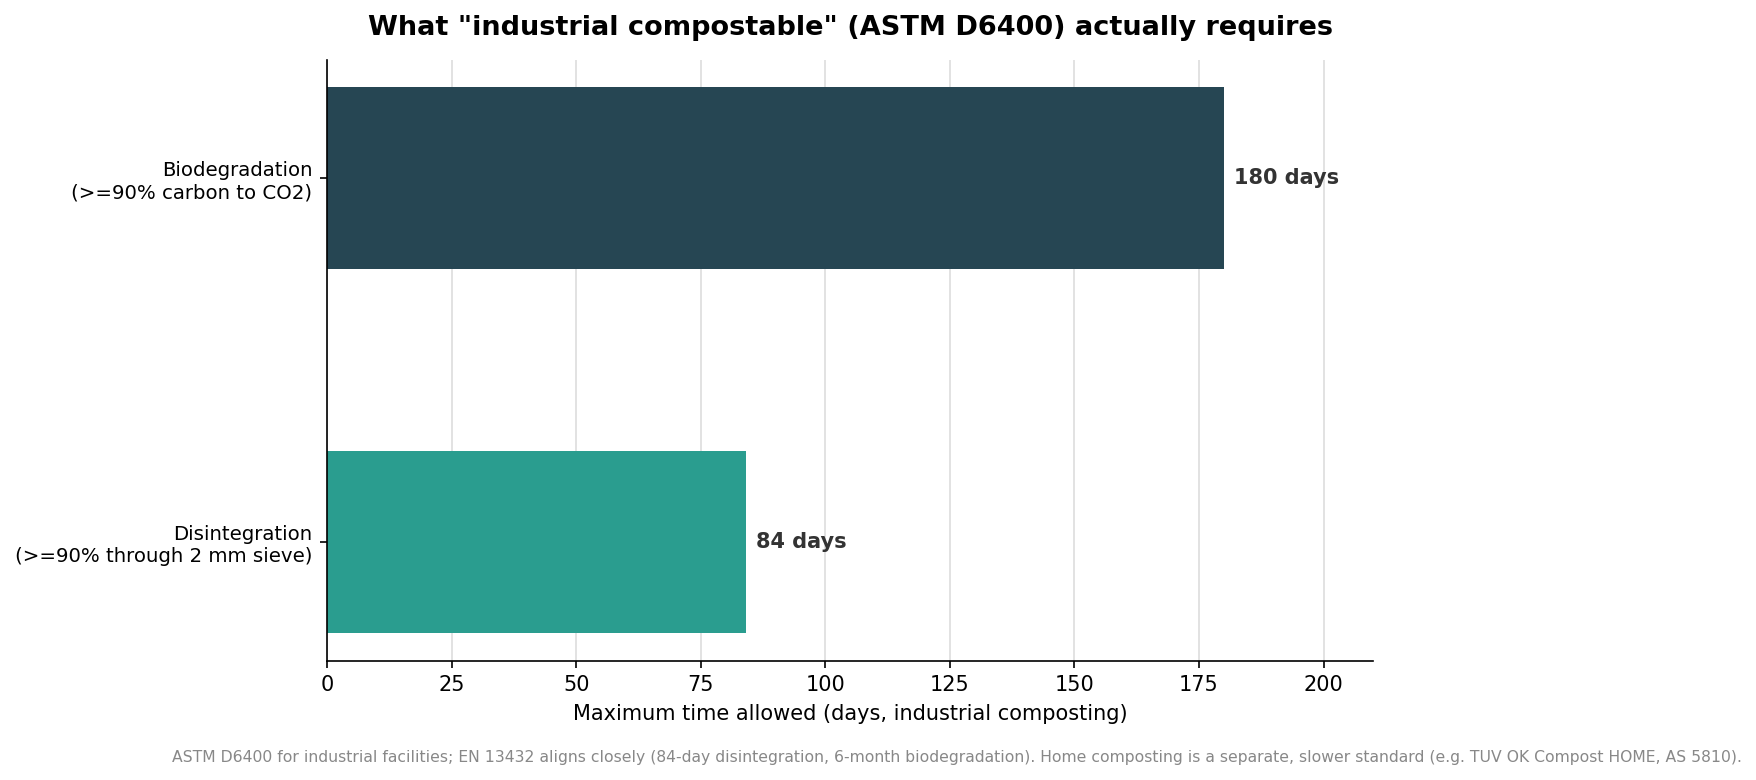
    If you plan to put a leaf, a chasing-arrows symbol, or the word “compostable” on a pouch, understand that those claims are governed. A pouch marketed as industrial compostable in the U.S. is expected to meet ASTM D6400 for plastics, or ASTM D6868 for compostable coatings on fiber. That standard is specific: at an industrial composting facility the material must disintegrate so that at least 90 percent passes a 2 mm sieve within 84 days, and biodegrade to at least 90 percent conversion of its organic carbon to carbon dioxide within 180 days, with additional ecotoxicity and heavy-metal limits. Europe’s EN 13432 aligns closely. Crucially, these are industrial-composting standards; a pouch that meets them will not necessarily break down in a backyard bin, which is verified separately under home-compost schemes such as TUV OK Compost HOME or the Australian AS 5810.

    Horizontal bar chart of ASTM D6400 industrial compostability requirements: 84-day disintegration and 180-day biodegradation
    ASTM D6400’s industrial-composting thresholds; home compostability is a separate, slower standard entirely.

    The labeling itself carries legal exposure. The Federal Trade Commission’s Green Guides warn against unqualified “biodegradable” or “compostable” claims, and California has gone further: its truth-in-labeling law restricts the recyclability chasing-arrows symbol to materials actually collected and recycled, and a companion rule requires that anything labeled compostable meet the ASTM standards and be clearly identifiable. On the recycling side, most laminated barrier pouches that combine foil or multiple polymers are not accepted curbside; only mono-material polyethylene structures are designed for the film recycling and store drop-off pathways, and those programs themselves change, so verify current acceptance rather than printing a claim that may not hold. When in doubt, qualify the claim or leave it off.

    Child-resistant and category-specific rules

    Some contents pull in extra requirements. Cannabis and many nicotine or supplement products are sold in states that mandate child-resistant packaging, and the reference points are the federal test protocol at 16 CFR 1700.20, established under the Poison Prevention Packaging Act, and ASTM D3475, which classifies child-resistant packages. A child-resistant pouch has to pass testing with panels of children and adults, and a supplier selling into these categories should be able to point to a certified closure or a passing test report rather than simply calling a zipper “child-resistant.” If your product is a dietary supplement, remember the pouch is only one part of a labeling regime that also governs the panel content itself, so coordinate the packaging spec with whoever manages your label compliance.

    Supplier quality systems and the paper trail

    Beyond the product, the plant that makes your pouch matters to retailers and co-packers. The credentials they most often look for are a recognized packaging or food-safety management certification, commonly BRCGS for packaging materials, ISO 22000, or SQF. Ask whether the manufacturer holds one, and ask for a certificate of analysis or compliance for your run. Two more items round out the file. California’s Proposition 65 can require a warning if a product exposes consumers to listed substances, so confirm your packaging does not create an unexpected obligation. And the Toxics in Packaging laws adopted by roughly twenty states cap the sum of lead, cadmium, mercury, and hexavalent chromium intentionally added to packaging at 100 parts per million, which reputable film suppliers already meet but which you should still see stated.

    None of this needs to be intimidating. The efficient path is to hand your supplier a short list and expect written answers: confirm food-contact compliance for the exact structure, confirm no intentionally-added PFAS, back any compostable or recyclable claim with the relevant ASTM standard or drop it, provide a certified child-resistant closure if your category requires one, and share the plant’s food-safety certification and a certificate of compliance. Get those five documents in hand before production and the pouch that lands on the shelf is not just attractive, it is defensible, which is exactly what a serious brand needs when a retailer or regulator comes asking.

  • How Many Custom Stand-Up Pouches Should You Order? — Custom Stand-Up Pouches

    Call or Text us: (929) 605-4397

    HomeBlog › How Many Custom Stand-Up Pouches Should You Order?

    Ordering

    How Many Custom Stand-Up Pouches Should You Order?

    07/02/2026

    Ordering custom stand-up pouches for the first time, most brands either over-order a launch and tie up cash in inventory that sits in a warehouse, or under-order and get caught paying a worse per-unit price on a rushed reorder right as they sell through. Both mistakes cost real money, and both are avoidable.

    The math is simpler than it looks once you separate your need into its actual use cases, because a one-time product launch, a subscription program, and a steady retail reorder all follow different logic.

    Start with your program type, not a round number

    Before picking a quantity, sort your need into one of three buckets: a product launch or limited run (a new SKU, a seasonal flavor, a market test), a subscription or DTC program (a predictable monthly ship volume), or an ongoing retail reorder (steady sell-through you replenish against). Each has a different right-sizing approach, and conflating them is the most common ordering mistake we see.

    Launches and limited runs: forecast conservatively, then hit the minimum

    For a new SKU or a market test, order enough to prove demand without drowning in inventory. Our 500-unit minimum is designed for exactly this — enough for a real shelf presence and early sales data, small enough that you’re not committing to a number before you know it sells. If early signs are strong, reorder against real velocity rather than guessing high on the first run.

    Subscription and DTC: order to your ship rate plus a buffer

    If you ship a predictable volume each month, order two to three months of pouches at a time to earn volume pricing while keeping cash efficient. Add a 10–15% buffer for growth and the occasional damaged-in-transit or filling-line loss. A program shipping 800 pouches a month should order roughly 2,000–2,500 per run.

    Retail reorders: match your velocity and your price break

    Once a SKU is selling steadily, size each reorder to your sell-through and to where the price curve rewards you. The jump from 500 to a few thousand units is where most of the per-unit savings live, so if your velocity supports it, ordering a full quarter at once usually beats frequent small batches on both price and lead time.

    Program typeHow to size itTypical order
    Launch / limited runConservative forecast, hit the MOQ500–2,000 pouches
    Subscription / DTC2–3 months of ship rate + buffer1,500–10,000 pouches
    Retail reorderMatch velocity to the price break2,000–20,000 pouches
    Multi-SKU brandCombine styles for volume pricing5,000–100,000+ pouches
    Key takeawaySize a launch off a conservative forecast at the 500-unit minimum, and order subscription or retail volume by the quarter rather than the week for better pricing and lead time.

    The fastest way to get this right is to tell us your program type when you request a quote — we’ll ask the right follow-up questions and recommend a quantity that fits your budget and your calendar instead of leaving you to guess.

    More posts

  • Matte vs. Gloss vs. Kraft: Choosing a Pouch Finish — Custom Stand-Up Pouches

    Call or Text us: (929) 605-4397

    HomeBlog › Matte vs. Gloss vs. Kraft: Choosing a Pouch Finish

    Buyer guides

    Matte vs. Gloss vs. Kraft: Choosing a Pouch Finish

    06/11/2026

    The finish of a stand-up pouch does as much brand work as the artwork printed on it. Matte, gloss, and kraft each send a different signal before a shopper reads a single word, and choosing the wrong one can make a premium product look cheap or a fun product look stuffy.

    None is objectively better. The right finish depends on the category you compete in, the shelf you sit on, and the feeling you want a shopper to have when they pick the pouch up.

    Matte: craft, premium, and calm

    A matte laminate has a soft, non-reflective surface that reads as considered and premium. It photographs beautifully, hides fingerprints, and gives artwork a muted, sophisticated tone. It’s the go-to for specialty coffee, gourmet snacks, supplements, and any brand positioned as high-end or minimalist. A soft-touch matte adds a tactile, almost velvety feel that makes an everyday product feel like a treat.

    Gloss: bold, vivid, and energetic

    A gloss finish is reflective and makes color pop, so it’s the choice when you want maximum shelf impact and vibrant, appetizing artwork. Snacks, candy, kids’ products, and bold, high-energy brands use gloss to grab attention from across the aisle. If your strategy is to be the brightest thing on the shelf, gloss delivers it.

    Kraft: natural, honest, and handmade

    Kraft film’s natural brown tone and matte texture read as artisanal, small-batch, and eco-minded. Ink sits into the surface for a stamped, intentional look. It’s ideal for granola, tea, natural foods, and any brand whose story is ‘made with care.’ Kraft is also one of the most cost-effective films, so it delivers a premium impression at a friendly price.

    Mixing finishes and adding foil

    You don’t have to choose just one. Spot gloss over a matte pouch highlights a logo; foil stamping — gold, copper, or white — adds a line of luxury to matte or kraft. Many brands use a consistent base finish across a line and vary an accent per SKU to keep the family coherent while distinguishing flavors.

    FinishReads asBest for
    MattePremium, calm, craftCoffee, gourmet, supplements
    GlossBold, vivid, energeticSnacks, candy, kids’ products
    KraftNatural, honest, handmadeGranola, tea, natural foods
    Foil accentLuxury, gift-worthyGourmet, holiday, gift lines
    Key takeawayChoose matte for premium calm, gloss for bold shelf pop, and kraft for a natural handmade story — then add foil or spot gloss to lift a logo without changing the base.

    Still deciding? Tell us your category and the shelf you compete on and we’ll recommend a finish as part of your free mockup — and show you exactly how it reads before anything prints.

    More posts

  • Custom Stand-Up Pouches for Coffee Roasters: A Freshness Guide — Custom Stand-Up Pouches

    Call or Text us: (929) 605-4397

    HomeBlog › Custom Stand-Up Pouches for Coffee Roasters: A Freshness Guide

    Coffee

    Custom Stand-Up Pouches for Coffee Roasters: A Freshness Guide

    05/21/2026

    For a coffee roaster, the bag is doing two jobs at once: protecting a perishable, aromatic product, and selling your roastery on a shelf full of competitors. Get the packaging wrong and you lose freshness, shelf appeal, or both. Get it right and the bag becomes one of your best marketing assets.

    Here’s how to choose a coffee pouch that keeps beans fresh and makes your brand the one customers pick up.

    Why coffee needs a degassing valve

    Freshly roasted beans release carbon dioxide for days after roasting. Seal them in a bag with no outlet and the bag balloons and can burst; leave the bag open and oxygen stales the coffee. A one-way degassing valve solves both — it lets CO2 out without letting oxygen in, so your coffee keeps its aroma and your pouch keeps its shape. For any roaster bagging fresh coffee, a valve isn’t optional.

    Barrier is everything for aroma and shelf life

    Coffee is stale-fastened by oxygen, moisture, and light. A high-barrier foil or metallized laminate blocks all three, protecting the volatile aromatics that make specialty coffee worth its price. If your coffee sits on a shelf or in a warehouse before it’s brewed, barrier is the difference between a bag that tastes fresh and one that tastes flat.

    Closures that drive the repeat purchase

    A resealable zipper lets customers reclose the bag between brews, keeping the last cup as good as the first — a small detail that quietly drives reorders. A tin-tie gives a classic, artisanal look for a slightly more manual reclose. Either signals that you’ve thought about the customer’s experience past the point of sale.

    Finish and print that earn the premium

    Matte laminates read as specialty and craft; gloss pops for bold brands; kraft says small-batch. Full-color digital printing suits short single-origin runs and seasonal releases, while rotogravure delivers the deepest color at volume. Foil stamping adds a metallic accent that photographs beautifully for the shelf and the feed.

    NeedRecommended specWhy
    Fresh roasted beansValve + high-barrier foilCO2 out, oxygen and light blocked
    Repeat purchaseResealable zipper or tin-tieKeeps the last cup fresh
    Specialty / single-originMatte finish, digital printCraft look, cost-effective short runs
    High volume / house blendRotogravure printDeepest color at scale
    Key takeawayFor coffee, a one-way valve plus a high-barrier film protects the roast, and a resealable closure drives the repeat purchase. Match matte-and-digital for specialty and rotogravure for volume.

    Tell us your roast volume, bag size, and brand look and we’ll spec a coffee pouch — valve, barrier, closure, and finish — and send a free mockup within one business day.

    More posts

  • Barrier Films Explained: Foil, BOPP, Mono-PE, and Compostable — Custom Stand-Up Pouches

    Call or Text us: (929) 605-4397

    HomeBlog › Barrier Films Explained: Foil, BOPP, Mono-PE, and Compostable

    Buyer guides

    Barrier Films Explained: Foil, BOPP, Mono-PE, and Compostable

    05/05/2026

    Behind every good stand-up pouch is a film structure most buyers never see and rarely understand. But the film is what keeps your product fresh, determines whether your packaging is recyclable or compostable, and moves your per-unit cost up or down. Knowing the basics helps you spec the right pouch instead of over- or under-protecting your product.

    Here’s a plain-language guide to the four film families we use most, and when each is the right call.

    High-barrier foil: maximum protection

    A foil or metallized structure blocks oxygen, moisture, and light almost completely, which makes it the gold standard for products that stale fast or are light-sensitive — coffee, some supplements, and premium dry goods. It’s opaque, which suits products you don’t need to show, and it delivers the longest shelf life. It costs a little more, but for the right product it pays for itself in reduced waste and preserved quality.

    BOPP laminate: the versatile workhorse

    Matte or gloss BOPP laminate is the most common pouch film for good reason: it prints beautifully, offers solid moisture and decent oxygen protection, and can incorporate a clear window. It’s the default for snacks, confectionery, and many dry foods where you want strong shelf appeal at a moderate barrier level and a friendly price.

    Recyclable mono-PE: sustainability that recycles

    Mono-material polyethylene structures are designed to be recyclable in store drop-off streams, unlike traditional multi-material laminates. They offer good moisture protection and moderate barrier, and they let a brand make a credible recyclability claim. For brands whose sustainability angle is recycling rather than composting, mono-PE is the practical choice.

    Compostable PLA/kraft: breaks down after use

    Certified compostable films made from PLA and plant-based kraft break down in industrial composting rather than lingering as plastic. Modern compostable structures include a barrier liner so they still protect the product, and they let sustainability-led brands back up an eco claim. They sit at the higher end on price, but for the right brand the story is worth it.

    FilmProtects againstBest for
    High-barrier foilOxygen, moisture, light (max)Coffee, supplements, premium dry goods
    BOPP laminateMoisture, moderate oxygenSnacks, confectionery, dry foods
    Recyclable mono-PEMoisture, moderate oxygenRecyclability-led brands
    Compostable PLA/kraftMoisture, moderate barrierCompostability-led eco brands
    Key takeawayMatch the film to the product and the claim: foil for maximum freshness, BOPP for versatile shelf appeal, mono-PE for recyclability, and compostable PLA/kraft for a genuine compostable story.

    Not sure which structure your product needs? Tell us what you’re packaging and your sustainability goals and we’ll spec the right film in your free mockup — protection matched to product, not over-engineered.

    More posts

  • Clear-Window vs. Full-Print Pouches: Which Sells Better? — Custom Stand-Up Pouches

    Call or Text us: (929) 605-4397

    HomeBlog › Clear-Window vs. Full-Print Pouches: Which Sells Better?

    Buyer guides

    Clear-Window vs. Full-Print Pouches: Which Sells Better?

    04/16/2026

    One of the earliest decisions on a snack or food pouch is whether to include a clear window that shows the product, or to print the whole pouch and let the artwork carry the shelf. Both work — but they work for different products, and choosing wrong leaves sales on the table.

    Here’s how to decide whether your product should be seen, or your brand should be shown.

    When a window sells for you

    A clear window is a powerful sales tool when the product itself looks appetizing or premium: colorful candy, hearty trail mix, golden granola, glossy coffee beans, marbled jerky. Seeing the product lets shoppers judge quality and portion with their own eyes, which builds trust and closes impulse buys. If your product photographs well in real life, show it.

    When full print wins

    Full-print pouches win when the product isn’t visually distinctive — a powder, a uniform-looking snack, a supplement — or when your brand and design are the main draw. A full canvas gives you room for bold artwork, storytelling, nutrition and claims, and a cohesive brand system. If the shopper is buying the brand more than the look of the contents, print the whole pouch.

    You can do both

    A window and strong print aren’t mutually exclusive. A well-placed window — a strip, a shaped portal, a partial reveal — combined with vivid printing around it often outperforms either alone: the artwork stops the shopper and the window closes the sale. The key is placing the window to frame the product at its best, not just cutting a hole in the design.

    Practical trade-offs

    Windows slightly reduce total print area and can marginally affect barrier depending on placement, so light-sensitive products (like coffee) often skip them in favor of full opaque protection. For most snacks and dry goods, though, the sales lift from visibility outweighs the trade-off. We’ll flag any barrier consideration for your specific product.

    ProductBetter choiceWhy
    Colorful snacks / candyClear windowAppetizing product sells itself
    Powders / supplementsFull printContents aren’t a selling point
    Coffee / light-sensitiveFull print, opaqueBarrier beats visibility
    Premium mixed productWindow + printArtwork draws, window closes
    Key takeawayUse a window when the product looks appetizing and full print when the brand is the draw — and for many snacks, a framed window plus vivid print beats either on its own.

    Tell us your product and we’ll recommend a window shape and placement (or full print) in your free mockup — and show you both options if it’s a close call.

    More posts

  • Custom Stand-Up Pouches for Snack Brands: Winning the Shelf — Custom Stand-Up Pouches

    Call or Text us: (929) 605-4397

    HomeBlog › Custom Stand-Up Pouches for Snack Brands: Winning the Shelf

    Snacks

    Custom Stand-Up Pouches for Snack Brands: Winning the Shelf

    03/26/2026

    In the snack aisle, the buying decision happens in seconds, and the packaging makes or breaks it. A snack brand competing for that split-second glance needs a pouch that grabs attention, shows quality, and merchandises cleanly — because the best product in the world loses to a better-looking bag next to it.

    Here’s how snack brands use stand-up pouches to win the shelf and the impulse buy.

    Bold print and gloss to stop the shopper

    Snacks live and die on shelf impact. Vivid full-color printing on a gloss laminate makes color pop and appetite appeal jump off the shelf. In a category driven by impulse, being the brightest, most appetizing thing in the shopper’s eyeline is a real advantage — save the muted minimalism for categories where calm reads as premium.

    A window to prove the product

    For chips, candy, popcorn, jerky, and trail mix, a clear window lets shoppers see exactly what they’re getting. Visibility builds trust and closes impulse purchases in a way copy can’t. Place the window to frame the product at its most appetizing, and pair it with bold print around the edges for the best of both.

    Formats and merchandising features

    Match the pouch size to the occasion: single-serve grab-and-go, sharing size, and family bags, ideally as a coherent family. A hang-hole lets you merchandise singles on clip strips and pegboards near the register — prime impulse real estate. A resealable zipper on larger sizes keeps snacks fresh and signals value.

    Keep the line coherent as you scale

    As you add flavors and sizes, keep a consistent base finish and layout and vary an accent color or the window per SKU. A coherent family reads as an established brand and makes a multi-SKU shelf block look intentional — which itself signals quality to shoppers and buyers alike.

    Snack goalRecommended specWhy
    Maximum shelf popGloss + full-color printBright, appetizing, impulse-driving
    Prove product qualityClear windowShoppers see what they buy
    Impulse placementHang-hole single-serveClip strips and pegboard real estate
    Multi-flavor lineConsistent finish, varied accentCoherent, established-brand look
    Key takeawayWin the snack shelf with bold gloss print to stop the shopper, a window to prove the product, and a hang-hole for impulse placement — kept coherent across a growing flavor line.

    Tell us your snack, your target shelf, and your flavor lineup and we’ll design a pouch family with a free mockup within one business day — then keep your specs on file for effortless new-flavor additions.

    More posts